ServiceNow
Supported Versions
Please note that using a supported version is mandatory.
Product | Supported Deployment Types | Supported Versions |
|---|---|---|
ServiceNow | All | Utah, Vancouver, Washington, Xanadu, Yokohama |
Environmental Prerequisites
The environmental prerequisites for this product are listed below.
Confirm the prerequisites of the corresponding integration template before continuing further, as some templates may not require all environmental prerequisites.
How to set the required ZigiOps integration user permissions in ServiceNow?
The ZigiOps integration user requires certain access to your ServiceNow instance to properly work with the corresponding entities and records depending on the integration use case. Note that you must always grant READ, CREATE and WRITE permissions to your primary integrated entity (incident, event, problem, etc.).
Note that the below steps are optional and informative. You may use them as a reference or as an example.
Create a new Custom Role in ServiceNow. OPTIONAL
Go to ServiceNow → User Administration → Roles and create a new role, as shown below.

Save the changes.
Create the required ACLs in ServiceNow.
Elevate the
security_adminprivilege.Go to ServiceNow → System Security → Access Control (ACL) and create new ACLs, as shown below.
You may limit the ZigiOps access by adding conditions. Note that adding conditions will prevent all other references from working for ZigiOps and the integration.

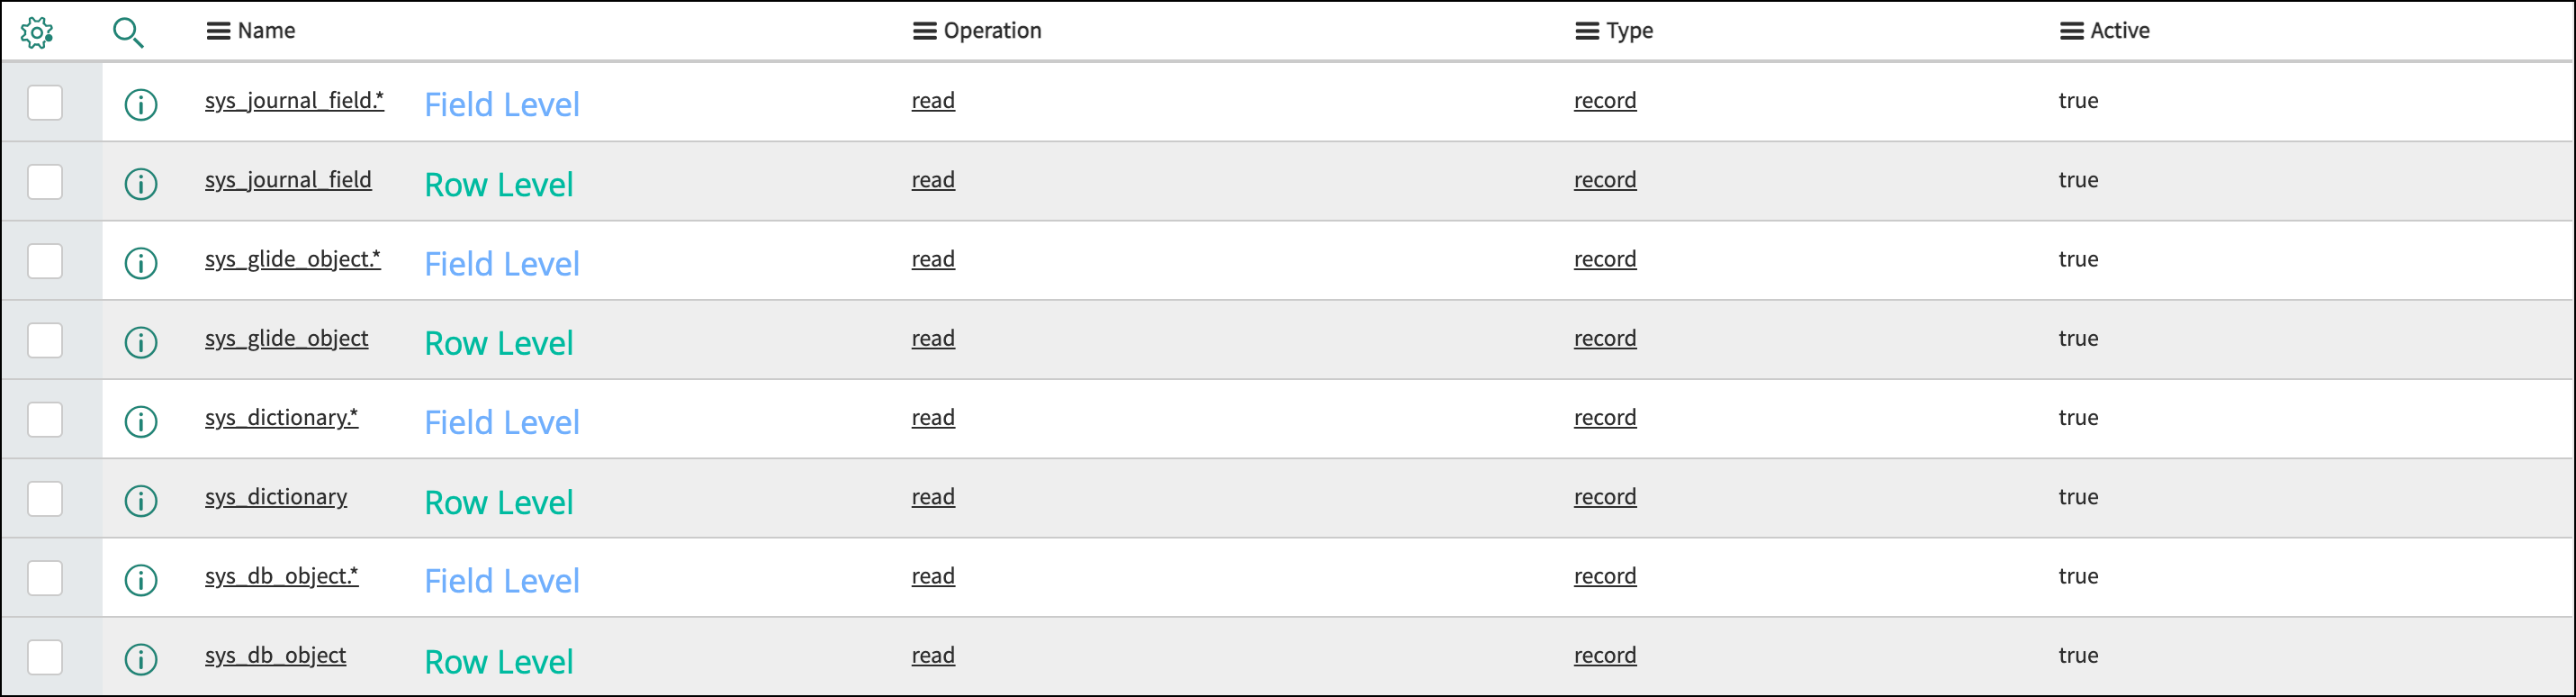
sys_db_object →
READ(row-level) andREAD*(field-level) are required so that ZigiOps can fetch the available ServiceNow tables;sys_dictionary →
READ(row-level) andREAD*(field-level) are required so that ZigiOps can fetch the available ServiceNow references between the integrated entity and its related tables;sys_glide_object →
READ(row-level) andREAD*(field-level) are required so that ZigiOps can fetch the field types of the ServiceNow tables;sys_journal_field →
READ(row-level) andREAD*(field-level) are required so that ZigiOps can collect comments and work notes;
Assign the newly created ACLs to the
zigiops_integration_rolecustom role.
Assign the
zigiops_integration_roleanditilroles to the ZigiOps integration user. Note that integrating entities outside the scope of the role, like custom tables, will require additional permission configuration.
How to install the "ZigiOps: Integrate Micro Focus OBM with ServiceNow" scoped application to ServiceNow?
APPLICATION OVERVIEW
The application is bundled with all necessary ServiceNow modules. With the application installed, ZigiOps can insert the data through the application's staging table at first. After that, the data is passed to a Transform Map, reading the data and populating the corresponding table. When an integrated ServiceNow record is updated, an application's business rule will send an HTTP request to ZigiOps, which will update the corresponding source system record, thus achieving backward synchronization.
INSTALL THE APPLICATION
Start by requesting the ZigiOps for Operations Bridge application from the ServiceNow Store.
Click the Request App button to request a confirmation approval to get the application.
Once ZigiWave approves the confirmation, go back to the application page and click the Get button.
Now login to your ServiceNow instance and navigate to System Applications > Applications > Downloads, and you should see the ZigiOps for Operations Bridge application available for installation. Click the Install button.
POST-INSTALL ACTIONS
Before enabling the integration, you will need to create a new ServiceNow User, which ZigiOps will use to send data to ServiceNow, and some optional points with regards to the ServiceNow instance that you should check:
Create a new user in ServiceNow, which ZigiOps will use in the ZigiWave ZigiOps settings page.
While logged in ServiceNow with a user with enough privileges, navigate to User Administration > Users and click the New button and specify the user details and assign the below user roles:
x_ziw_obm.admin
personalize_read_dictionary
If there are any custom fields within the ServiceNow incident table, you will have to synchronize them with the application's staging table.
Switch the application to ZigiOps for Operations Bridge in the application selector, then navigate to ZigiOps for Operations Bridge > Inbound Service, check the Copy fields from the target table option, select the corresponding table, and click the Update button.
Now navigate to ZigiOps for Operations Bridge > Transform Maps, open the ZigiWave Transform Map entry, click the Auto Map Matching Fields related link, and press the Update button.
CONFIGURE THE APPLICATION
The settings in the application are relevant for the backward synchronization process. There is a business rule, which will be triggered on an update of an integrated record created by the integration user. The script in the business rule will call a REST Message function, which uses the details from the ZigiOps for Operations Bridge > Integration Settings to send a PUT request to ZigiOps, which on its own will update the corresponding source system record.
Navigate to ZigiOps for Operations Bridge > Integration Settings and configure the settings:
ZigiWave ZigiOps URL → Input the URL to the ZigiOps listener followed by its port. For example, https://zigiops.example.com:9091.
MID Server Name → Input the name of the MID Server to be used, if any. Since the integration supports two deployment types, you might use a MID Server or don't use one by leaving the field empty.
Maximum Retries for Outbound Service → Set the maximum number of retries; the REST message will try to send an update to the ZigiOps in case of failure. This option is only used in a deployment scenario WITHOUT MID Server.
Examine the settings and click the Submit button.
Connected System Configuration
Follow the steps below to add your instance as a connected system.
Log into your ZigiOps instance.
Navigate to Connected Systems → Add New System → ServiceNow and configure the following parameters:
Server URL → Input the URL of your instance. For example,
https://example.service-now.com.Username → Input the username of the ServiceNow user.
Password → Input the password for the above ServiceNow user.
Proxy Settings → Enables the usage of a proxy server if needed.
Examine the settings and if they are correct, click the Save button to save the system.
Related Templates
- Azure DevOps work items to ServiceNow incidents
- Bitbucket commits to ServiceNow incidents
- Bitbucket issues to ServiceNow incidents
- Cherwell change requests to ServiceNow change requests
- Jira tasks to ServiceNow incidents
- OBM events to ServiceNow incidents
- OBM events to ServiceNow incidents (Staging Table)
- ServiceNow incidents to Azure DevOps issues
- ServiceNow incidents to GitHub issues
- ServiceNow incidents to Jira tasks
- ServiceNow problems to Jira bugs
- ServiceNow server topology to uCMDB node topology
- ServiceNow service catalog tasks to Jira tasks
- ServiceNow VMware instances topology to vROps custom group members topology
- ServiceNow VMware instances topology to vROps topology
- SolarWinds alerts to ServiceNow incidents
- Zabbix host topology to ServiceNow topology
- Zabbix topology to OBM topology
- Zabbix trigger events to ServiceNow events
- Zabbix trigger events to ServiceNow incidents